Winter Expressions: Exploring Winter Experiences Through Art

IMG_2004

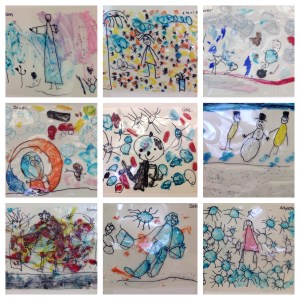
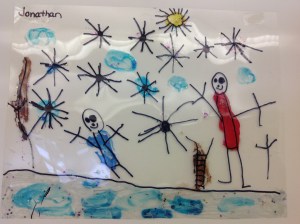
“This is a snowman and me. I drew snowflakes and wind and trees. My mom threw carrots everywhere; even on the tree – for the animals!” (J.A.T.)

After finally getting a proper dusting of snow, the children were extremely interested in talking about all things winter. Our morning circle time was dominated by stories about snowy walks to school, wet mittens, and plans for play in the snow later in the day. However, I still have quite a few children who are hesitant to share their thinking during our large group conversations or reflections, so I wanted to find a way to provide all my students with an opportunity to talk about their experiences with winter. I have often found that some children are more willing to open up when they are engaged in some sort of activity – be it building, drawing, or even cleaning up. I remembered a beautiful blog post I came across last winter when I was at home on maternity leave that documented the winter conversations children were able to share while creating art about winter in their atelier (you can find my inspiration here: Conversations About Winter, Solstice, and the Changing Light). I decided that art was definitely the way to go.

This exploration was done on acetate sheets (I placed a white sheet of paper underneath each acrylic sheet for better visibility) with permanent markers, tempera paint, and glitter paint. Tempera paint will peel/flake off the acrylic paper when dry, so you must use the glitter paint (mine was a washable tempera glitter paint, but dried like plastic) with the tempera together if you don’t want the paintings to fall apart when they are done. I didn’t try using acrylic paint, but that would likely work as well. Perhaps even finger paint….but I suggest you test your materials before you try it with the children.

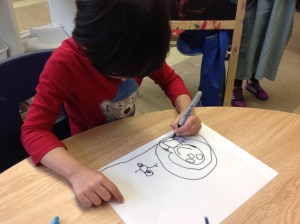
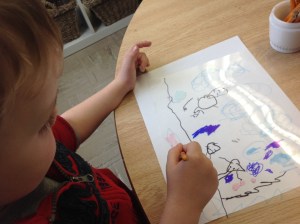
First, the children drew their pictures with the permanent markers. As they drew, many children looked out the window for inspiration. Most of the children talked openly about what they were drawing. For the children who are more hesitant to talk, I tried to guide the conversation by asking open-ended questions about the weather, winter activities, and family life.

IMG_2001

IMG_2003

“That’s me and my snowman. I see wind out our window so I’m adding swirly wind. And here are the trees with no leaves. The sun is shining on my snowman so I put something special on it so it won’t melt.” (R.A.)

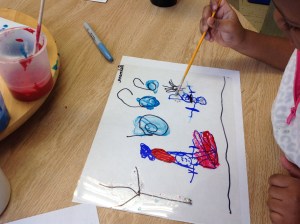
When the children were done sketching, they used the paints to add colour and extra details to their work. When I introduced this centre, we talked about why we were using tiny brushes in the paint – specifically, how the small brushes allow us to add fine details to our work. This idea recently came up in another painting project we had done and the children are beginning to understand how material choices can affect what they are able to accomplish. By highlighting that small brushes make for finer details I find that the children go into the project with the mindset of adding special details to their work.

IMG_2020

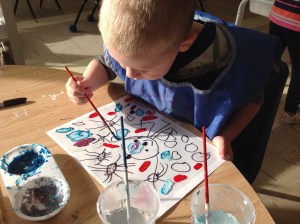
I noticed that when children are engaged in detailed work they really “lean in” to the project. You can tell by this student’s body language that he is extremely focused and engaged in his work.

IMG_2002

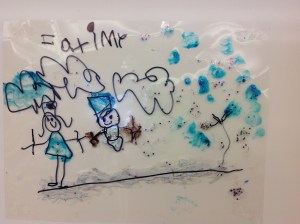
“This is me and my dad and my brother. I like shoveling the snow. This is my shovel.” (C. P.)

Each day we took some time during reflection time to share some of the children’s finished art pieces. Either I read my notes about what the children said while they worked (their “stories”) or the children presented it in their own words, or both. It was definitely a celebration of learning!

IMG_2047

“I was outside playing in the snow. The wind was almost coming! I see the sun up in the sky. I think the sun is shining on the snow. I wonder if the snow is going to melt?” (F.M.)

IMG_2045

“I like that it’s snowing in winter – that you can catch snowflakes with your tongue. We are playing outside. We’re going to [the school] to slide down the big hill.” (J.T.)

IMG_2046

“I like snowflakes because I get them on my tongue! I made LOTS of snowflakes. Look at my snow! I’m outside with my hat. I have snow on my head but it’s okay.” (C.G.)

IMG_2120

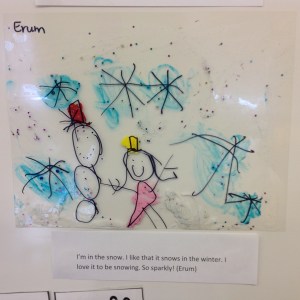
“I’m in the snow. I like that it snows in the winter. I love it to be snowing. So sparkly!” (E. H.)

photo


Nests, revisited…

Image

One of the things I’ve noticed about inquiry projects is how everlasting the learning is. Our projects never really end; though we may “shelve” our thinking and ideas for a time, we often revisit our projects throughout the year – or even in the following year. Earlier in the fall I wrote about a nest inquiry we embarked on after one of my students brought in a nest she found on her way to school (you can read about it here: “Whose Nest is This?”). This Spring, students started thinking about an inquiry from last year where we studied the birds in our yard. As the weather warmed up, the children started noticing our sparrows territorially guarding the bird houses in the courtyard and began speculating that the birds might be preparing nests for their babies, as they had done last year. This created some interesting discussion and wondering about nests. Some of the questions that came up were:

Why do birds (and other animals) build nests?

How do they build nests? What materials do they use? How long does it take?

We really wished we could see inside our bird houses so we could see what the birds were up to! To that end, I found a clip on YouTube that showed a time lapse of a bird building a nest inside a birdhouse (some clever person had set up a video camera in the roof of the house to capture the whole process – boy, did my students think THAT was a genius idea!).

To capitalize on the students’ interest in nests, I created a provocation at the Art Studio. We had been working with clay over the last few weeks and I wanted to give the students a new experience with this popular material. Here is the provocation:

Image

Students were asked to sculpt a nest out of clay and make sure that it could safely hold at least one egg. Students were also asked to add “texture” to their nests using a variety of materials. Fitting an egg proved to be a wonderful challenge that encouraged the children to problem solve as they worked  – making their nests deeper, wider, or taller as necessary to safely hold the egg. When it came to adding texture, we spent some time holding real bird nests and describing how they felt – “rough,” “prickly,” “scratchy.” “soft,” “smooth,” etc. Children were given simple tools (popsicle sticks, toothpicks, forks, etc.) to add the texture they felt was appropriate. This was a new experience for my students, as our previous work with clay had required them to make their pieces as smooth as possible. Some children had a hard time scratching up their work – in their minds, the nests needed to be smooth because “that’s what clay should feel like.” I was fascinated by this line of thinking. It just goes to show that we often misinterpret the messages that children receive from us from our teaching.

Image

S.M: The inside of my nest is very big so all the eggs can fit and won’t fly out because of the wind!

Y.T: I made my nest with clay. First, I made a circle and then I put my thumb in and pushed. First the egg didn’t fit and then I pinched it more and tested it but it still didn’t fit, then I tested it again and it fit!

G.M: Nests are for baby birds. The nest keeps the eggs from falling out on the ground where someone might eat them.

Image

J.M.: Nests are very scratchy. I’m going to pinch it to make it rough. I really enjoyed making this!

J.K.: Nests have a bumpy texture.

S.M.: My nest has a rough texture on the outside and a smooth texture on the inside. It’s smooth in the inside because we don’t want to hurt the birds.

Image

Image

After completing our nests, the children were given the opportunity to paint an egg to put inside. We read An Egg is Quiet by Dianna Hutts Aston and Silvia Long (one book of many in a wonderful series – definitely worth checking out!) where we learned about the different sizes, shapes, designs, and textures eggs can have. We also discovered that eggs can be laid by a wide variety of animals! While working on their eggs, the children were asked to imagine what creature might hatch from their egg – a wonderful, creative exercise that greatly influenced how the children designed and painted their eggs.

Image


M: That’s a crab egg. It’s red with black spots!

M.B. I knew he was making a crab egg. I knew it because he made it so red!

Image

M.C: I’m painting my egg black because there’s a black snake inside!

R.K.: Mine is a blue jay egg. It’s just blue because a blue jay is blue. Oh, I love my egg!

J.M.: I made my egg green with white, yellow, and blue. I put on black speckles and blue lines. There’s a little robin inside.

Our display of nests and eggs is in the centre of our classroom, at the children’s level. Our students can be found admiring their work daily (and they can’t wait to take them home!).

Are you working on a bird or nest inquiry at the moment? What kind of thinking is happening in your class? I’d love to hear what you are up to!